> ## Documentation Index
> Fetch the complete documentation index at: https://speckle-assistant.mintlify.site/llms.txt
> Use this file to discover all available pages before exploring further.
# AutoCAD and Civil 3D
export const app_0 = "AutoCAD Civil 3D"
export const versions_0 = "2021, 2022 & 2023"
export const connector_0 = "AutoCAD Civil 3D"
Notice: This user guide is based on the legacy {connector_0} connector.
We recommend using our new connectors instead, as they are easier to use and actively maintained. This legacy documentation may not be up to date.
Legacy Speckle supports {app_0} versions: {versions_0}
## Getting started
To begin, you'll need to install this connector and add your Speckle account. Follow our instructions in [Speckle Manager](/legacy/user/manager) if you haven't already.
Once installed, you can find this connector in the `Add-Ins` tab under `Speckle 2`. Clicking this button will open the Speckle connector interface, which shows a list of all the projects you currently have in the model.
## User interface
This connector uses our shared Desktop UI.
### Sending data
The AutoCAD Civil3D Connector supports selection filtering by layer.
### Receiving data
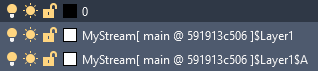
Geometry from projects will be added to AutoCAD / Civil3D layers starting with a prefix with the following format:
```
project[ model @ version id ]
```
Any layer information from the incoming project will be appended to the prefix with the standard AutoCAD delimiter `$`. When receiving from applications (like Rhino) with nested layers, the incoming full layer path will replace any default delimiters with `$`.
 ## User interface